
디스코드 봇 제작 시작하기 (With DiscordJS, TypeScript)
목차
소개
Discord.JS는 Node.JS를 기반으로 디스코드 봇을 개발할 수 있는 기능을 제공하는 라이브러리입니다. Discord API를 직접 사용하는 것보다 더 쉽게 시작할 수 있고, 다양한 기능을 지원합니다. Typescript는 Javascript의 Superset으로, 타입을 지원하여 더 안정적인 개발을 가능하게 합니다. 만약 Javascript에 익숙하다면 Typescript를 배우는 것은 큰 도움이 될 것입니다.
준비사항
Discord.js와 TypeScript로 봇을 개발하기 위해 필요한 것들:
- Node.js - Node.js 공식 웹사이트에서 최신 LTS 버전을 설치하세요. LTS 22.x 버전 이상을 권장합니다.
- 디스코드 계정 - Discord 계정이 필요합니다.
- 코드 에디터 - Visual Studio Code를 권장합니다.
- 기본적인 JavaScript/TypeScript 지식 - 기본 문법을 이해하고 있어야 합니다.
디스코드 개발자 포털 설정
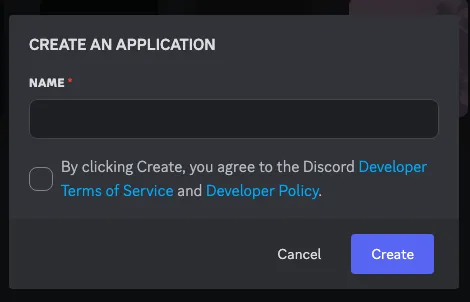
1. 애플리케이션 생성
- Discord Developer Portal에 로그인합니다.
- 오른쪽 상단의 “New Application” 버튼을 클릭합니다.
- 봇의 이름을 입력하고 “Create” 버튼을 클릭합니다.
2. 봇 사용자 설정
- 왼쪽 사이드바에서 “Bot” 항목을 선택합니다.
- “Add Bot” 버튼을 클릭하고 확인합니다.
- 봇 설정에서 다음 옵션을 구성합니다:
- PUBLIC BOT: 다른 사용자가 봇을 초대할 수 있게 할지 설정합니다.
- PRESENCE INTENT, SERVER MEMBERS INTENT, MESSAGE CONTENT INTENT: 필요한 인텐트를 활성화합니다. 개인적으로 사용하실거라면 전부 활성화하셔도 됩니다. 다만 접속 서버가 100개를 넘어가게 되면 별도 인증을 통과하셔야 하기 떄문에, 이후 필요한 인텐트만 활성화하셔야 합니다.
- “Reset Token” 버튼을 클릭하여 봇 토큰을 생성하고 안전하게 복사합니다. 이 토큰은 한 번만 표시되므로 안전한 곳에 저장하세요!
3. OAuth2 설정 및 봇 초대
- 왼쪽 사이드바에서 “OAuth2” > “URL Generator”를 선택합니다.
- “SCOPES”에서 “bot”과 “applications.commands”를 선택합니다.
- “BOT PERMISSIONS”에서 봇에 필요한 권한을 선택합니다 (예: “Send Messages”, “Read Message History” 등). 이 역시 개인적으로 사용하실거라면 관리자 권한을 주셔도 됩니다.
- 생성된 URL을 복사하여 웹 브라우저에서 열고, 봇을 초대할 서버를 선택합니다.
TypeScript 프로젝트 설정
1. 프로젝트 초기화
# 프로젝트 폴더 생성 및 이동
mkdir discord-bot
cd discord-bot

# npm 초기화 (package.json 생성)
npm init -y

# TypeScript 및 필요한 패키지 설치
npm install discord.js dotenv
npm install -D typescript @types/node ts-node nodemon
2. TypeScript 설정
프로젝트 루트 디렉토리에 tsconfig.json 파일을 생성합니다. tsconfig.json은 TypeScript 컴파일러의 설정을 정의합니다.
{
  "compilerOptions": {
    "target": "ES2020",
    "module": "NodeNext",
    "moduleResolution": "NodeNext",
    "esModuleInterop": true,
    "outDir": "./dist",
    "rootDir": "./src",
    "strict": true,
    "noImplicitAny": true,
    "resolveJsonModule": true,
    "skipLibCheck": true,
    "forceConsistentCasingInFileNames": true
  },
  "include": ["src/**/*"],
  "exclude": ["node_modules", "dist"]
}
3. 환경 설정
프로젝트 루트에 .env 파일을 생성합니다. .env 파일은 환경 변수를 저장하는 파일입니다. 코드 내에 직접 토큰을 작성하지 않고, 환경 변수를 통해 안전하게 관리할 수 있습니다.
TOKEN=여기에_봇_토큰_입력
CLIENT_ID=여기에_애플리케이션_ID_입력
GUILD_ID=테스트_서버_ID_입력
4. 프로젝트 구조 만들기
다음과 같은 폴더 구조를 생성합니다.
다음 명령어로 폴더를 한번에 생성할 수 있습니다.
mkdir -p src/{commands,events}폴더 구조를 설명하자면, 우선 src 폴더 안에 commands, events 폴더를 생성합니다. 각 폴더는 다음과 같은 역할을 합니다:
commands: 슬래시 명령어를 정의하는 폴더입니다.events: 디스코드 이벤트를 처리하는 폴더입니다.index.ts: 봇의 시작 파일입니다.
discord-bot/
├── src/
│   ├── commands/
│   ├── events/
│   └── index.ts
├── .env
├── .gitignore
├── package.json
└── tsconfig.json
만약 git을 사용중이시다면 .gitignore 파일에 다음 항목을 추가합니다. .gitignore 파일은 Git이 무시할 파일이나 폴더를 지정하는 파일입니다.
node_modules/
dist/
.env
5. 스크립트 설정
package.json 파일에 다음 스크립트를 추가합니다. 타입스크립트는 JavaScript로 변환하는 과정이 필요하므로, 빌드 후 실행하는 스크립트를 추가합니다. 개발 중에는 파일 변경이 잦기 때문에 nodemon과 ts-node를 사용하여 실시간으로 파일을 감시하고 자동으로 재시작하도록 설정합니다. ts-node는 TypeScript 파일을 직접 실행할 수 있게 해주는 패키지입니다.
"scripts": {
  "start": "node dist/index.js",
  "dev": "nodemon --exec ts-node src/index.ts",
  "build": "tsc",
  "deploy": "ts-node src/deploy-commands.ts"
}
기본 봇 코드 작성
1. 클라이언트 설정
src/index.ts 파일을 생성합니다:
import { Client, Collection, GatewayIntentBits, Events, ClientEvents, ChatInputCommandInteraction } from 'discord.js';
import { config } from 'dotenv';
import fs from 'fs';
import path from 'path';
import { deployCommands } from "./deploy-commands";

// .env 파일 로드
config();

// 클라이언트 인스턴스 생성
const client = new Client({
    intents: [
        GatewayIntentBits.Guilds,
        GatewayIntentBits.GuildMessages,
        GatewayIntentBits.MessageContent,
    ],
});

interface Command {
    data: {
        name: string;
    };
    execute: (interaction: ChatInputCommandInteraction) => Promise<void>;
}

// 명령어를 저장할 컬렉션
const commands = new Collection<string, Command>();

// 명령어 파일 로드
const commandsPath = path.join(__dirname, 'commands');
const commandFiles = fs.readdirSync(commandsPath).filter(file => file.endsWith('.ts'));

for (const file of commandFiles) {
    const filePath = path.join(commandsPath, file);
    import(filePath).then((command) => {
        if ('data' in command && 'execute' in command) {
            commands.set(command.data.name, command);
        } else {
            console.warn(`${filePath} 명령어에 필요한 "data" 또는 "execute" 속성이 없습니다.`);
        }
    });
}

// 이벤트 파일 로드
const eventsPath = path.join(__dirname, 'events');
const eventFiles = fs.readdirSync(eventsPath).filter(file => file.endsWith('.ts'));

for (const file of eventFiles) {
    const filePath = path.join(eventsPath, file);
    import(filePath).then((event) => {
        if (event.once) {
            client.once(event.name as keyof ClientEvents, (...args) => event.execute(...args));
        } else {
            client.on(event.name as keyof ClientEvents, (...args) => event.execute(...args));
        }
    });
}

// 상호작용 이벤트 처리
client.on(Events.InteractionCreate, async interaction => {
    console.log(`상호작용 발생: ${interaction.user.tag} (${interaction.user.id})`);
    if (!interaction.isChatInputCommand()) return;

    const command = commands.get(interaction.commandName);

    if (!command) {
        console.error(`${interaction.commandName} 명령어를 찾을 수 없습니다.`);
        return;
    }

    try {
        await command.execute(interaction);
    } catch (error) {
        console.error(`명령어 실행 중 오류 발생:`, error);

        if (interaction.replied || interaction.deferred) {
            await interaction.followUp({
                content: '명령어 실행 중 오류가 발생했습니다!',
                ephemeral: true
            });
        } else {
            await interaction.reply({
                content: '명령어 실행 중 오류가 발생했습니다!',
                ephemeral: true
            });
        }
    }
});

// 봇 로그인
client.login(process.env.TOKEN).catch(error => {
    console.error('봇 로그인 오류:', error);
    process.exit(1);
});

// 준비 완료 이벤트
client.once(Events.ClientReady, () => {
    console.log(`${client.user?.tag}으로 로그인 성공!`);
    console.log(`봇이 ${client.guilds.cache.size}개의 서버에서 실행 중`);


    for (const guild of client.guilds.cache.values()) {
        try {
            deployCommands();
        } catch (error) {
            console.error(`${guild.name}(${guild.id}) 서버에서 명령어 배포 실패:`, error);
        }
    }

    // 봇 상태 설정
    client.user?.setPresence({
        activities: [{ name: '/help 명령어로 도움말 보기', type: 3 }],
        status: 'online',
    });
});

// 프로세스 에러 처리
process.on('unhandledRejection', (error) => {
    console.error('처리되지 않은 Promise 거부:', error);
});

// commands 컬렉션 내보내기 (다른 파일에서 명령어 목록에 접근할 수 있도록)
export { commands };
슬래시 명령어 구현
1. 명령어 등록 스크립트
src/deploy-commands.ts 파일을 생성합니다:
import { REST, Routes } from 'discord.js';
import { config } from 'dotenv';
import fs from 'fs';
import path from 'path';

// .env 파일 로드
config();

/**
 * 슬래시 명령어를 Discord API에 등록하는 함수
 * @param options 옵션 객체 (선택적)
 * @param options.guildId 서버 전용 명령어 등록을 위한 서버 ID (선택적)
 * @param options.global 전역 명령어 등록 여부 (기본값: true)
 */
export async function deployCommands(options: { guildId?: string; global?: boolean } = {}) {
    const { guildId, global = true } = options;

    const commands = [];
    const commandsPath = path.join(__dirname, 'commands');
    const commandFiles = fs.readdirSync(commandsPath).filter(file => file.endsWith('.ts'));

    // 명령어 로드
    for (const file of commandFiles) {
        const filePath = path.join(commandsPath, file);
        const command = await import(filePath);

        if ('data' in command && 'execute' in command) {
            commands.push(command.data.toJSON());
        } else {
            console.warn(`${filePath} 명령어에 필요한 "data" 또는 "execute" 속성이 없습니다.`);
        }
    }

    // REST API 인스턴스 생성
    const rest = new REST({ version: '10' }).setToken(process.env.TOKEN || '');

    try {
        console.log(`${commands.length}개의 슬래시 명령어를 등록 중...`);

        // 전역 명령어 등록 (global이 true일 때)
        if (global) {
            await rest.put(
                Routes.applicationCommands(process.env.CLIENT_ID || ''),
                { body: commands },
            );
            console.log('전역 슬래시 명령어 등록 완료!');
        }

        return true;
    } catch (error) {
        console.error('명령어 등록 중 오류 발생:', error);
        return false;
    }
}

// 직접 실행될 때 자동으로 명령어 배포 실행
if (require.main === module) {
    deployCommands().catch(error => {
        console.error('명령어 배포 실패:', error);
        process.exit(1);
    });
}
2. 기본 명령어 만들기
src/commands/ping.ts 파일을 생성합니다:
import { SlashCommandBuilder, ChatInputCommandInteraction } from 'discord.js';

export const data = new SlashCommandBuilder()
    .setName('ping')
    .setDescription('봇의 응답 속도를 확인합니다.');

export async function execute(interaction: ChatInputCommandInteraction): Promise<void> {
    const sent = await interaction.reply({ content: '핑 측정 중...', fetchReply: true });
    const pingTime = sent.createdTimestamp - interaction.createdTimestamp;
    const apiPing = interaction.client.ws.ping;

    await interaction.editReply(`지연 시간: ${pingTime}ms | API 지연 시간: ${apiPing}ms`);
}
src/commands/help.ts 파일을 생성합니다:
import { SlashCommandBuilder, ChatInputCommandInteraction, EmbedBuilder } from 'discord.js';

export const data = new SlashCommandBuilder()
    .setName('help')
    .setDescription('도움말을 표시합니다.')

export async function execute(interaction: ChatInputCommandInteraction): Promise<void> {
    const embed = new EmbedBuilder()
        .setColor(0x0099FF)
        .setTitle('🔍 도움말')
        .setDescription('도움말을 표시합니다.')
        .setThumbnail(interaction.client.user?.displayAvatarURL() || '')
        .setTimestamp()
        .setFooter({
            text: `요청자: ${interaction.user.tag}`,
            iconURL: interaction.user.displayAvatarURL()
        });

    embed.addFields(
        { name: '명령어 사용법', value: '명령어를 입력하면 도움말을 표시합니다.', inline: false },
        { name: '명령어 예시', value: '/ping, /server', inline: false },
        { name: '명령어 설명', value: 'ping: 봇의 응답 속도를 확인합니다.\nserver: 서버 정보를 표시합니다.', inline: false }
    );


    await interaction.reply({ embeds: [embed] });
}
명령어 핸들러 구조화하기
더 복잡한 명령어를 위한 구조를 갖추려면 명령어를 카테고리별로 구분할 수 있습니다. 다음은 유틸리티 명령어의 예시입니다:
src/commands/server.ts:
import { SlashCommandBuilder, ChatInputCommandInteraction, EmbedBuilder } from 'discord.js';

export const data = new SlashCommandBuilder()
    .setName('server')
    .setDescription('서버 정보를 표시합니다.');

export async function execute(interaction: ChatInputCommandInteraction): Promise<void> {
    // 서버가 없는 DM에서는 작동하지 않음
    if (!interaction.guild) {
        await interaction.reply({ content: '이 명령어는 서버에서만 사용할 수 있습니다.', ephemeral: true });
        return;
    }

    const { guild } = interaction;

    // 서버 생성 일자 포맷팅
    const createdAt = new Intl.DateTimeFormat('ko-KR', {
        year: 'numeric',
        month: 'long',
        day: 'numeric',
        hour: '2-digit',
        minute: '2-digit'
    }).format(guild.createdAt);

    const embed = new EmbedBuilder()
        .setColor(0x0099FF)
        .setTitle(`${guild.name} 서버 정보`)
        .setThumbnail(guild.iconURL() || '')
        .addFields(
            { name: '소유자', value: `<@${guild.ownerId}>`, inline: true },
            { name: '멤버 수', value: `${guild.memberCount}명`, inline: true },
            { name: '서버 ID', value: guild.id, inline: true },
            { name: '생성일', value: createdAt, inline: true },
            { name: '채널 수', value: `${guild.channels.cache.size}개`, inline: true },
            { name: '이모지 수', value: `${guild.emojis.cache.size}개`, inline: true }
        )
        .setFooter({ text: '서버 정보 요청됨' })
        .setTimestamp();

    await interaction.reply({ embeds: [embed] });
}
봇 실행하기
이제 모든 설정이 완료되었습니다. 봇을 바로 실행하려면 npm run dev 명령어를 사용하세요. 이 명령어는 ts-node를 사용하여 TypeScript 파일을 직접 실행합니다.
npm run dev봇 배포 및 호스팅
1. 빌드 및 실행
# TypeScript 코드 빌드
npm run build

# 봇 실행
npm start
2. 디스호스트 서버에 업로드
디스호스트 서버에 업로드하기 위해서는 Pterodactyl 패널을 통해 파일을 업로드해야 합니다. 디스호스트 가이드를 참고하여 Pterodactyl 패널에 접속하고, 업로드한 후 봇을 실행하세요.
문제 해결 및 팁
만약 봇이 작동하지 않거나 오류가 발생한다면 디스호스트 공식 디스코드 서버에서 도움을 요청하세요. 또한, Discord.js 문서를 참고하여 더 많은 정보를 얻을 수 있습니다.